|
|
||||||||||
|
||||||||||

|
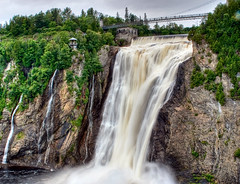
Weather you are using a digital single lens reflex, point and shoot, or even film cameras, they all behave the same when it comes to aperture, shutter, and ISO. These three items work in relation to each other to form a triangle. Together they control how much light is collected and thus control what is referred to as exposure. While reading this tutorial, feel free to use the camera simulator to see the effect of the three settings. The Components ISO stands for International Organization for Standardization with has nothing to do with what it is measuring. It is a standard measurement that all film and digital cameras use. ISO is used to measure the sensitivity of the image sensor in digital cameras or the emulsion surface in film cameras. The higher the number, the more sensitive it is to light. Both digital and film cameras have an adverse side effect to increasing the ISO value. As the ISO value is increased, noise will start to appear in the image. In film this will show as grain in the image. On digital you may see splotches or dots showing up in the picture. Newer digital cameras are getting better at controlling this side effect, but not completely eliminating it. Experimenting with your camera at different ISO settings in different lighting will give you an idea of how much noise will show at different settings. The shutter in the camera is used to control how long the light shines on the sensor or film. The longer the shutter is open, the more light can be collected. A shutter might only be open for 1/1000th of a second on a bright sunny day verses 30 seconds while taking pictures on a street at night. Moving objects can be affected by shutter speed. The quicker the movement, the quicker the shutter will have to open and close to prevent blurring. On the opposite end of the scale, you may wish to blur part of the scene. Taking a picture of a waterfall with the shutter open longer will cause the water in the picture to blur. This can make for a nice effect. As with ISO, experiment with the shutter to see what happens under different conditions. In the examples below you can see using a short shutter stops the motion of the truck and minimizes blurring due to its motion. The long shutter speed on the water falls allows the flowing water to blur.
Aperture is the most interesting of the three. A fairly simple mechanism that grows and shrinks the opening in which light passes through on its way into the camera. An interesting thing you will notice about aperture is the numbering system. I don't want to get into anything too technical, so we will just accept a simple way it works. The higher the number, the smaller the hole. Yes that's right. The higher the number, the smaller the hole. The lower the number, the larger the hole. Aperture also affects something called depth of field. That will be left for another tutorial. For now we will just look at how it affects the amount of light coming into the camera. If you want to take a picture in a low light scene, setting the aperture to a smaller number will let more light into the camera. On a bright sunny day, setting the aperture to a higher number will let less light into the camera. At this point you may want to start up the camera simulator. It will help see what changing the settings does to the result of the image. Also keep in mind the simulator emphasizes the effect of the settings. There are a few things you need to familiarize yourself with, like the three sliders that control the aperture, shutter, and ISO. The image will display the result of the three sliders, while the meter under the image will represent the meter in the camera. The last is the aperture size. This will give an idea of what the aperture in the camera is doing. The TriangleThese three settings form a triangle because any change made to one of the settings will affect one or two of the other settings. Trying to do the math involved in keeping all this straight would be so daunting, most beginners would be scared away from ever picking up a camera. Fortunately most modern cameras have a very smart brain to do the math for us. Most cameras have a light meter that is displayed to help out and warn you when the setting you have chosen will not give you the optimal result for exposure. Just about every camera has an auto mode that will let the camera do all the thinking for you. You just point the camera and shoot. Adjusting the ISO controls the sensitivity of the sensor or film to light. Moving the ISO slider in the simulator you will notice two things. As you move it to a higher number, the image becomes lighter. You will also notice that noise appears as you increase the ISO. This is because the sensor or film is trying to amplify the amount of light it is collecting. Cameras are getting better at reducing this noise, but it still exists to some extent. When you lower the ISO, the sensor or film will become less sensitive to light and the image will get darker. Move the ISO slider all the way to the right and then move the shutter slider all the way to the right. You will notice the picture is properly exposed with a lot of noise. Now move both the ISO slider and shutter slider all the way to the left. You now have a properly exposed picture with almost no detectable noise. Take a close look at the people in the image. Notice how they have become blurry. This is because moving objects will blur when using a slow shutter speed. In some cases this may be the desired effect, but not here if you want to see their faces. If you want to use a low ISO and still see their faces, you can try adjusting the aperture instead of the shutter speed. Return the shutter speed slider to the middle and move the aperture slider all the way to the left. As you move the aperture slider to the left, notice the aperture size getting larger. This larger size lets more light into the camera. You may also notice that the background has become blurry when you increase the size of the aperture. This is because the depth of field is changing. Try not to concern yourself with that right now. Move both the ISO and aperture sliders all the way to the right. Once again we have a properly exposed image, only this time we have a lot of noise.
At this point we can see that ISO and shutter speed have a relation. For a correct exposure, increasing the ISO means that you have to decrease the amount of time the shutter is open. Decreasing the ISO will mean the time the shutter is open will have to increase. We can also see a relation between ISO and aperture. The lower the ISO, the more light we need to let into the camera. The higher ISO, the less light we need to let into the camera. There is a third relationship we will now look at. Set all the sliders back to the middle. Move the aperture slider all the way to the left and the shutter slider all the way to the right. This keeps the exposure correct by altering the shutter speed to match the aperture and keep the exposure correct. With a larger aperture size more light enters the camera and the shutter needs to be quicker. With a smaller aperture size less light enters the camera and a slower shutter speed is required. It is also true for changing the shutter speed. If we want the shutter to stay open longer, we need to reduce the size of the aperture. For a faster shutter speed, we need to let more light into the camera by increasing the size of the aperture. Don't PanicThis may seem like a lot to deal with, but remember. Your camera does pretty much all this for you. There will be times when your camera will not be able to compensate and most cameras will tell you. It may suggest turning on the flash. If you camera has a meter, you will find this useful in some situations. In the camera simulator, there is a meter below the image. While you have been moving the sliders back and forth, you may have seen the green bars moving from left to right. The meter tells you if the picture is going to be over exposed, under exposed, or just right. Anything to the right is over exposed, and anything to the left is under exposed. Move some of the sliders around and take notice how the meter changes compared to the image. The meter gives a good estimation of what you will get before you take the picture. Move the ISO all the way to the left to the lowest value and move the aperture all the way to the right for the smallest opening. The meter is saying the picture will be under exposed and you can see the image is dark. To correct this we will need the shutter to stay open longer. Moving the shutter slider all the way to the left helps but the image is still under exposed. This means you have exceeded the limits of what the camera can do to take a correct exposure. Correcting the exposure is simple. The meter is telling us we need more light. We now know that ISO controls how sensitive the sensor or film is and aperture controls how much light is coming in to the camera. Simply adjusting the ISO and or the aperture will correct the exposure. I higher ISO or a larger size aperture should do the trick. ScenesSome cameras have pre-programmed scenes built into the camera. You may notice selections in the camera like Sports, Landscape, Close Up, and more. These settings help do some of the thinking for you. What they are is a set of predefined values for aperture and shutter. Sports for instance will use a faster shutter speed to capture motion. Take some time to learn what pre-defined settings your camera has and keep them in mind while you are out taking pictures. Give them a try and see what they do. Aperture PrioritySome cameras have a setting called aperture priority. With this setting, you can take control of the aperture and the camera will control the shutter for you. If you want to take a photograph of a landscape and want to use an aperture of f/8, you would set the camera to aperture priority mode and dial up f/8. The brain in your camera will adjust the shutter speed to match the lighting with the ISO and aperture you have selected. Shutter PriorityAs with aperture priority, if your camera has it, you can select the shutter speed you want and the camera will once again do the math for you. This can be useful if you are concerned about getting the right shutter speed for what you are photographing. If objects in the scene are moving and you want a sharp image, setting the shutter to a fast speed will capture the image with minimal blurring. On the other hand, if you want some blurring in the image, you can select a slower shutter to keep it open a little longer. Manual ModeBy selecting manual mode you disconnect most of the camera's brain from helping you out. About the only thing the camera will help you out with is by way of the meter. It will still do the math with the settings your provide and will feed that answer back to you through the meter to tell you if it thinks the image will be under exposed, over exposed, or properly exposed. The advantage of manual mode is you get full freedom over all the settings. Be prepared for some experimentation in this mode. Check Your ManualTo find out how to do this on your camera, check your manual, or perhaps the store you purchased it from. The internet may also be useful for finding out what features your camera has and how to use them. Now go out and have some fun with your camera. |